Photograms&Rayograms.
Photograms- a photographic image made without a camera by placing objects directly onto the surface of a light-sensitive material such as photographic paper and then exposing it to light. The time you expose it for vary, but you have to experiment first, then you'll know how long to expose it for the best results. The results is a negative shadow that usually shows the variation in tone and depends upon the transparency of the objects used. It's clearer if the objects were more opaque as it'd look more clearer and bold. This technique is sometimes called 'camera-less photography' as well.
Man Ray Photograms
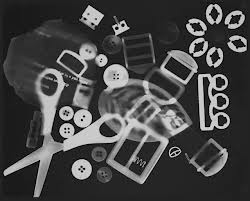
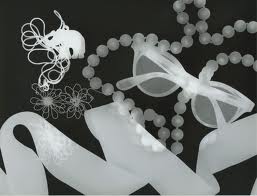
Man Ray was born August 27 1890. Man Ray is known for his works of 'photograms' which he called 'rayograms' in reference to himself. He's best known in the world as an avante-garde photographer, fashion and portrait photographer also. Though he claimed he discovered the technique through an accident in the dark room. On the left hand side (and also some above) are examples of his works. I particularly like the one on the left as i think the end result is quite good and we ca see that in many ways. For example, he used very opaque objects so that we could clearly see them after the process. Moreover, the objects have different tones in them, some of them have a more brighter tone whilst some of the objects are more grey and faint. I also like the composition Man Ray has placed the objects, as they are not all jumbled up into one messy picture, but he has carefully thought about it and it looks quite neat. I like the examples of Man Rays work, because it provides me of ways i can develop my composition and also the toning in it.
Man Ray was born August 27 1890. Man Ray is known for his works of 'photograms' which he called 'rayograms' in reference to himself. He's best known in the world as an avante-garde photographer, fashion and portrait photographer also. Though he claimed he discovered the technique through an accident in the dark room. On the left hand side (and also some above) are examples of his works. I particularly like the one on the left as i think the end result is quite good and we ca see that in many ways. For example, he used very opaque objects so that we could clearly see them after the process. Moreover, the objects have different tones in them, some of them have a more brighter tone whilst some of the objects are more grey and faint. I also like the composition Man Ray has placed the objects, as they are not all jumbled up into one messy picture, but he has carefully thought about it and it looks quite neat. I like the examples of Man Rays work, because it provides me of ways i can develop my composition and also the toning in it.
Process.
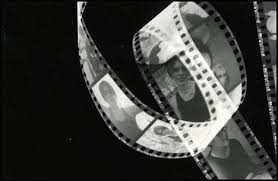
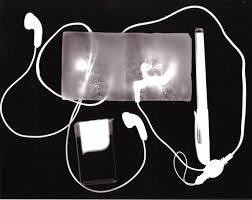
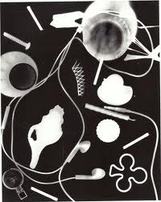
In our photograms, we used several objects to expose. We used objects such as- a key ring, a strip of film, light bulb, key, scissors and an iPhone. Throughout this whole process, the light in the room had to be turned off, but we had a very dim red light on, so that we could move around more safely. If the light was bright our photograms won’t come out and our experiment would’ve failed. After, the teacher gave us the photographic paper which was light sensitive; we placed our objects onto it. We didn’t really have an specific way for the composition but we didn’t want to make it look messy. Once we were satisfied with it, we began our process of exposing. The light we exposed on it was probably a medium brightness(4.5 apperture), then we moved away the lens so the light was on the paper for about one second. After that, we removed our objects from the photo paper and directly dipped it into the developer for 2 minutes. While we were counting we cold slowly see a picture forming. Once the two minutes were over, we used a tong to dip it into the next solution, which was the ‘stop’. It was in there for 1 minute. Finally, we dipped it into the ‘fix’ solution for 2 minutes. After, we hanged up our final piece on a wire with a peg, so that we could examine and analyse it.
In our photograms, we used several objects to expose. We used objects such as- a key ring, a strip of film, light bulb, key, scissors and an iPhone. Throughout this whole process, the light in the room had to be turned off, but we had a very dim red light on, so that we could move around more safely. If the light was bright our photograms won’t come out and our experiment would’ve failed. After, the teacher gave us the photographic paper which was light sensitive; we placed our objects onto it. We didn’t really have an specific way for the composition but we didn’t want to make it look messy. Once we were satisfied with it, we began our process of exposing. The light we exposed on it was probably a medium brightness(4.5 apperture), then we moved away the lens so the light was on the paper for about one second. After that, we removed our objects from the photo paper and directly dipped it into the developer for 2 minutes. While we were counting we cold slowly see a picture forming. Once the two minutes were over, we used a tong to dip it into the next solution, which was the ‘stop’. It was in there for 1 minute. Finally, we dipped it into the ‘fix’ solution for 2 minutes. After, we hanged up our final piece on a wire with a peg, so that we could examine and analyse it.
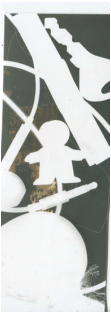
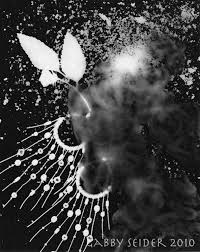
This is one of my test strip, where we were given a small strip of photographic paper to test out how long we will need for it to be successful. As it was quite thin, i couldn't really place my objects in a particular nice order. However, I quite like how my objects were arranged still. The aperture was 5.6 and i exposed it for around 2 seconds. After I took it out of the chemicals, i hanged it up, and i could clearly see the objects. However if there was a better tonal range, with a variety of black, white and greys . Next time, i need to lower down the aperture and expose it for less time so the photograms is better.
|
This
|
